Ok, in my previous post I let you all know that I started on my chair. Well guess what... I finally finished. Remember what the chair used to look like? Old dirty fabric with messed up webbing under the seat that didn't appear to be correctly done in the first place. It also had a pillow being used at the cushion which was stapled at the edges to the chair. Kinda weird. Anyhow, here's the before and after.
What it looks like after I transformed it...
Here's what it looked like before...
Now, I'll go through what I did. I first remove all fabric and webbing. I then sanded down all parts of the chair I planned to spray paint.
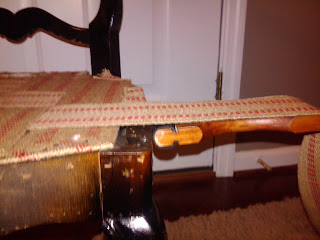
I basket weaved each cross peace. Adding the webbing requires a webbing stretcher which you use to pull the webbing taught to have a nice firm seat. See the pictures below.
You can find a webbing stretcher at Joann's. Be sure to purchase this with a coupon because it's definitely overly priced at Joann's. Once I finished I covered my webbing with burlap which I just stapled down to the chair. This isn't a required step but something I saw someone else do as added security so I decided to do the same. Especially since I had some left over from my headboard project.
Next, I added the foam. I used 3" thick foam but you may want to go with 2". I wanted my seat to be extra soft and comfy. Since my foam came as a square and my chair has a curved shape I had to cut the foam to size. I would suggest using an electric knife for easy cutting. You can use other cutting items like a regular knife or scissors but an electric knife will be the easiest and best tool.
Now add the batting. No special batting is needed. I used the cheapest batting Hobby Lobby sold. I stapled it underneath the seat and cut away the excess. The next and final step was to add the fabric. This was the most difficult task. I centered the fabric on the seat and began stapling from the middle front (underneath the seat). I then did the same to the back. In order to fit around the back of the chair 2 slits must be cut so that you'll have a middle flap to fold. Be sure to fold down all exposed edges. I had to use some trial and error on the corners. I'm satisfied with the outcome. I think I did pretty good for my first time. What do you think?


I think you did very good too! Thanks for the tips on the webbing - I've never tried that before, but want to now! I love the new fabric you chose as well.
ReplyDelete~ www.billiemonster.com ~
You should definitely try a project using the webbing. It's easy to do. Plus, the jute wedding is very inexpensive.
ReplyDeleteWebbing I meant... Sometimes auto correct can be a pain.
ReplyDelete