This picture isn't clear enough so I may need to go back and take another photo showing the zipper. But, I basically used this site for guidance and starting point...and again I did my own thing. Some steps on this site I didn't do but I didn't want the zipper to show especially since the zipper is black (the only color they had). I just ironed down my hem and stitched my zipper to the hem making sure my fold covered part of the zipper simply because I wanted for my zipper to not be visible. I used a cotton toille fabric above the zipper so it would appear when I folded my blanket down at the top. I opted for this choice for financial reasons. The solid cream fabric was a little cheaper than the toile, plus the cream fabric feels nice against the skin.
For the shams I read through this site and once again... you guessed it, I did my own thing. Simply because I don't too much care for the extra fabric that borders most standard shams. I went with a simpler look. In the end, you make your standard and euro shams in the same manner. You'll have one solid piece for the front and 2 pieces on the back that will flap over each other.
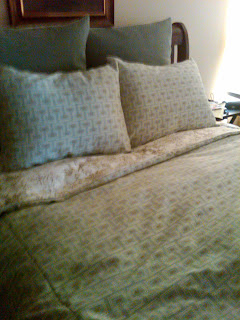
Just know that a standard pillow is 20"x26" and a euro pillow size is a 26" square. When cutting your fabric you'll want to allot extra for your hems. If you like the extra fabric bordering your shams then you'll need to allot for that as well when cutting your fabric. Here's my finished shams...
After sewing your front and back together don't forget to cut the corners as shown here so that when you flip them on the right side the corners of your shams will look crisp. When making your duvet you'll want to make sure you have enough space to sew because if you're using a heavy fabric like I used (an upholstery fabric) it'll get heavy and you'll need something to support it's weight.
In the end I think I came up with something I can be proud of. This is just the beginning of my master bedroom makeover...
These were the fabrics I used...
- Euro Shams: a soft velvety fabric from Joann's. I actually liked the wrong side of the fabric better because the color was a bit deeper and it looked as finished as the right side. I did use the right side of the fabric to make one side of an accent pillow... I'll post pics of it later. The other side is a piece of fabric I found in the remnants at Joann's.
- Duvet and Standard Shams: Upholstery Fabric from Joann's, Toile from Hobby Lobby (they had a 54" wide toile in the store, the website shows a 44"). I purchased the cream satin-like fabric from Hobby Lobby as well.
In the end I spent about $150 for all of my supplies. My fabrics were all on sale at the time of purchase. Joann's puts there on sale for either 40% or 50% off all the time. Hobby Lobby usually always have theirs at 30% off. At the discounted prices you'll be able to afford a high quality fabric.
FYI: You will always be able to gets fabrics from either store on sale! Never pay full price!!! They will either be on sale in the store or there will be a 40% coupon available on-line.
Overall, I really enjoyed this project and would definitely support doing it yourself. It's very rewarding to see something you did displayed in your own home. On top of that, with my down blanket inserted into my duvet it is SOOOO comfortable. :)
* FINISHED PRODUCT *
I'm still planning to make more accent pillows... at least one more. Maybe a neck roll.


No comments:
Post a Comment
Let me know what you think!... and please be nice. ;) Unfortunately, my comments are moderated due to spammers and those who like to post horrible things.